Wing Chun Wooden Dummy
In 2010 I made my own Wing Chun Kung Fu Wooden Dummy. The Wooden Dummy is a training tool that helps you practice the fighting techniques of Kung Fu. This post explains how and why I built it.
It’s not easy to find a Kung Fu training partner who’s always ready and willing to help by sticking his or her arms out while you practice your fighting techniques. This is why the wooden dummy is so useful. The arms and leg on the dummy aren’t supposed to exactly represent those of a human, but rather they represent obstacles around which you can practice your moves, and against which you can practice using your energy. Like a punching bag, the dummy is also useful for practicing combinations.
I started learning Wing Chun Kung Fu in 2009. After studying for about a year, I realised that I wanted to practice on a dummy. Today you can buy a dummy for between seven hundred and a thousand dollars - not including the shipping fee. This was more than I wanted to spend, so I decided to make one myself.
Like most of my endeavors, this project started online. I looked for instructions on making a dummy, and the best instructions that I found are here, at mccarriedesign.com.
The most difficult components of a Wooden Dummy to manufacture are the arms. Since I don’t own a lathe (or the skills to operate one) I decided to buy a set of arms from ebay. The next step was finding a 5 foot long cylinder of wood. I called Calumet Harbor Lumber, a lumber yard in Chicago and was able to find a log that was just the right size.
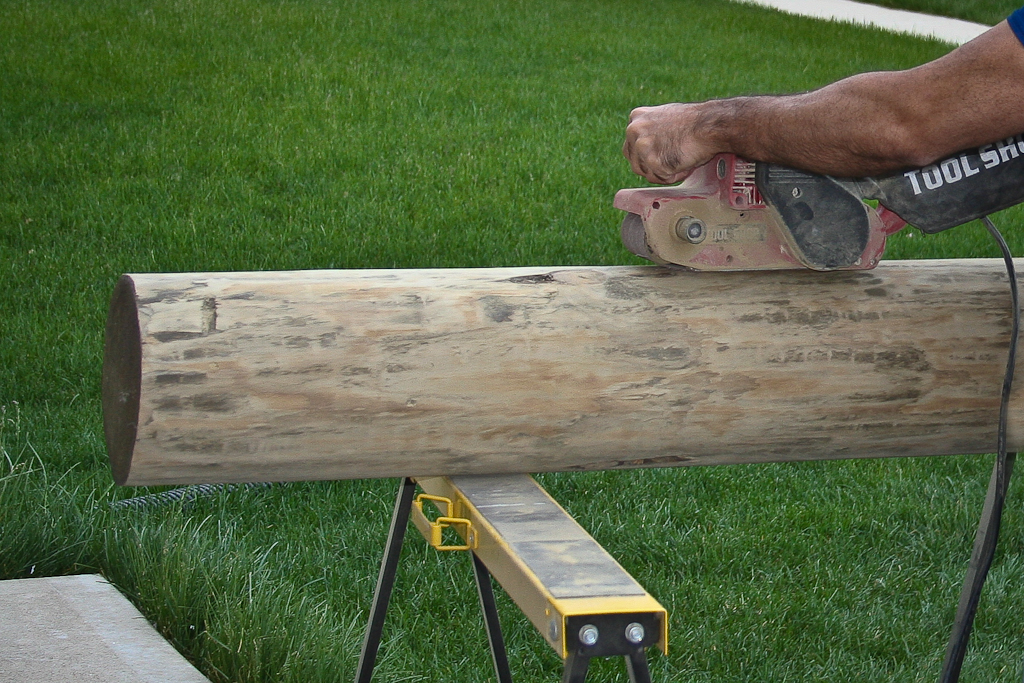
The bark was obviously very rough and painful to work with, so the first step was to sand the log and make it easier to work with. I set the log on a couple of saw-horses outdoors, so that I wouldn’t fill my garage with dust. I put on protective glasses and a hospital mask to protect my eyes and lungs and spent about an hour or so sanding it smooth. I didn’t bother filling up the cracks with putty first.
Sanding the log
The next step was to mark on the log where the holes for the arms and leg need to be drilled. The general idea is to drill circular holes and then straighten them out with a chisel and file. In order to do this, I had to find the center of the log’s flat face, and construct a template, or protractor, with two strips of wood. The strips of wood are attached at the center and spread apart until the parts that extend off the surface of the log are as far apart as the arms should be. Normally, the tips of the arms should be about 7.5 to 8 inches apart.
In order to find the center of the log, I tied a cord to the track of my garage door opener. I tied a wrench to the other end to keep the cord taught. I didn’t need to be very accurate, so I placed the log so that the cord went along the highest point of the log (the center). I traced a line along the cord with a pencil. Then I rotated the log and repeated this. Where the two lines intersected was the approximate center of the log. There are better and more accurate ways to do this, but accuracy isn’t critical for this project - the log isn’t perfectly circular in cross-section anyway.

Finding the center of the log
Once I had the center of the face, I screwed the arm template to the center. By this point I already had the finished dummy arms, so I measured how long they extended out of the dummy (11.75 inches). I measured 11.75 inches on the strips of wood out from the edge of the log and marked them with an ‘X’. I spread the strips out until those ‘X’ marks were 8 inches apart. Then I marked the curved surface of the cylinder right under the center point of each strip. I drew a line from each of those markings down the length of the log. The centerpoints of the holes that I would have to drill for the upper arms lay somewhere along the lines. Ideally, the arms have to be at my chest height. Knowing that, and knowing the dimensions of the box-part of the arms, I was able to mark where along each line I would have to drill.
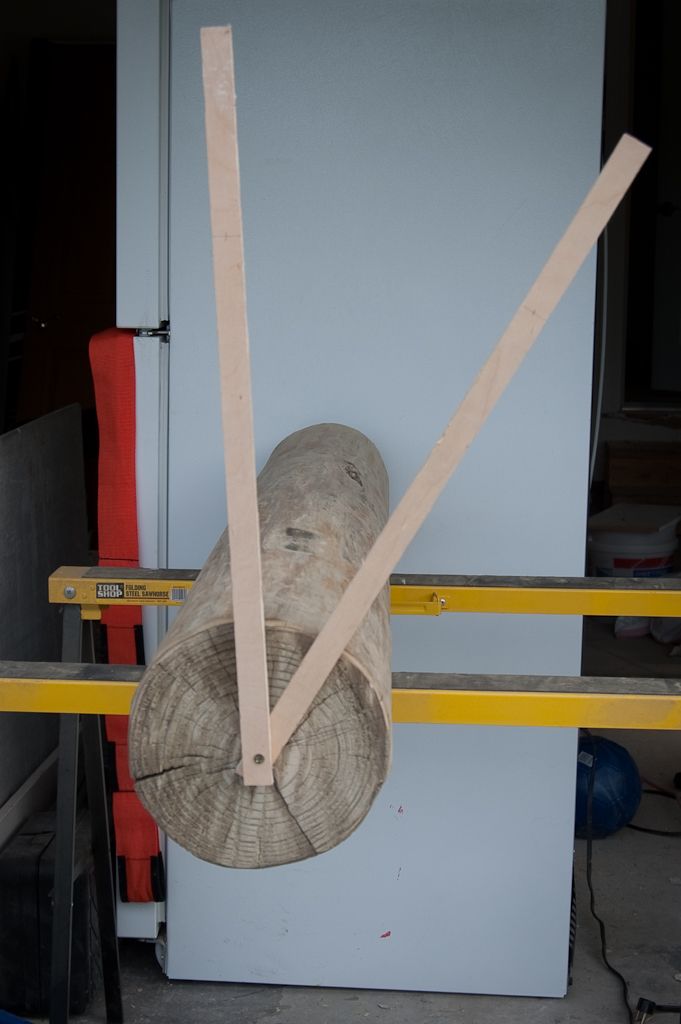
Using the arm template to determine where to drill
Once I had all the markings in place, it was time to drill. Drilling wasn’t too difficult. I used a spade drill bit to drill the holes. Unfortunately, I drilled the hole for the leg an inch off to the right by mistake, but by the time I noticed it was too late. Thankfully this error doesn’t make the dummy any less usable. Anyway, now the difficult part started - taking these round holes and making them square.
I learned how to sharpen my chisels and made sure they were as sharp as I could get them at the start of each session. I alternated between using chisels with mallets and wood files as I slowly chipped away at the wood. It took me a couple of weekends, but I finally got the edges square (enough).
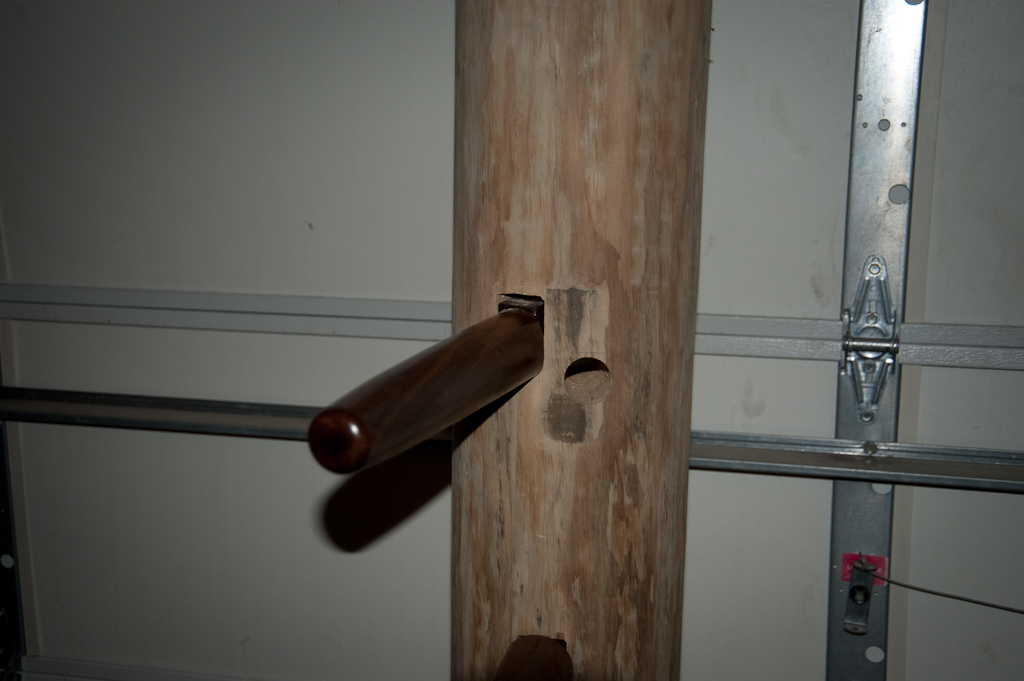
Got the first hole square

The completed arm holes
After making the leg, I was ready to mount the dummy. I decided to drill rectangular holes through the back of the dummy and insert wooden slats through them. Drilling these holes was very tricky because the holes had to be horizontal, otherwise the dummy would not stand up straight. I used a 12 inch long half-inch drill bit and again slowly chipped away with a file until the holes were satisfactory.
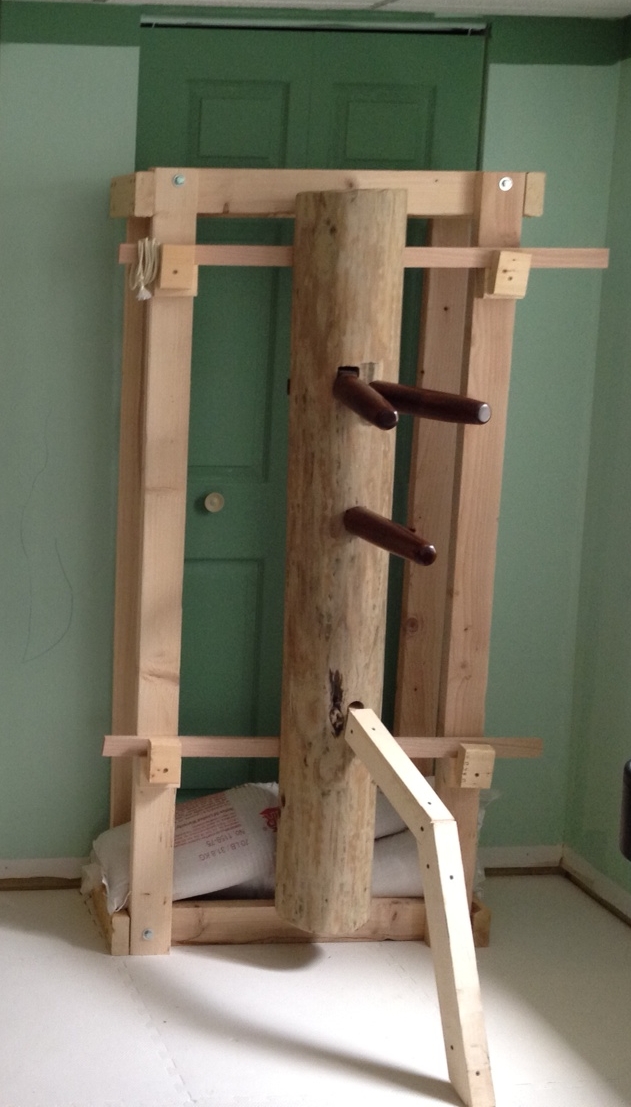
Finally it was time to mount the dummy. I decided I wanted the dummy to be portable, so instead of mounting it to a wall, I created a simple frame with two-by-fours, carriage bolts and 3” wood screwes, as you can see below. I initally weighted the frame down with two 90lb dumbbells.
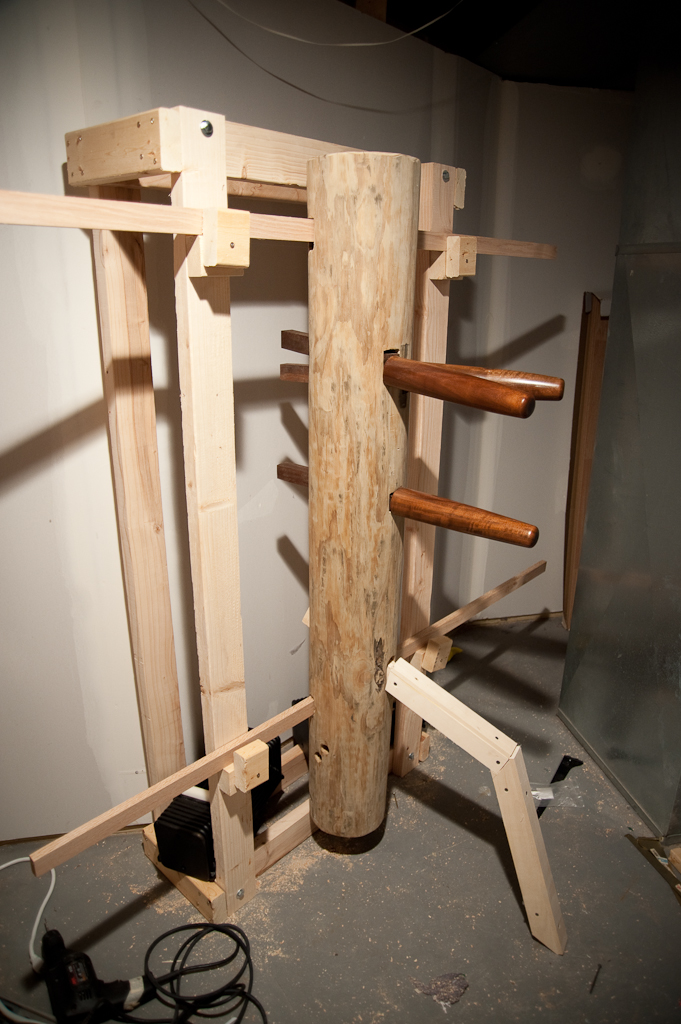
Side view of the finished product
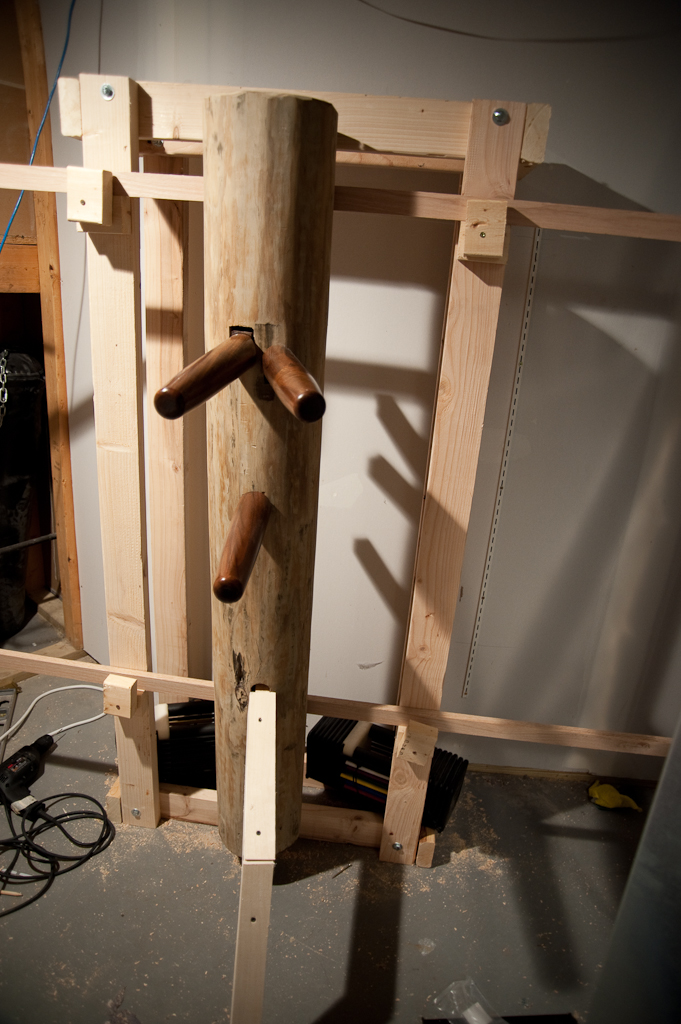
Front view of the completed dummy
When I was satisfied that the dummy was ready to use, I trimmed the slats and used two 70lb tubes of sand to weigh the dummy down, so that I could use my dumbbells again.
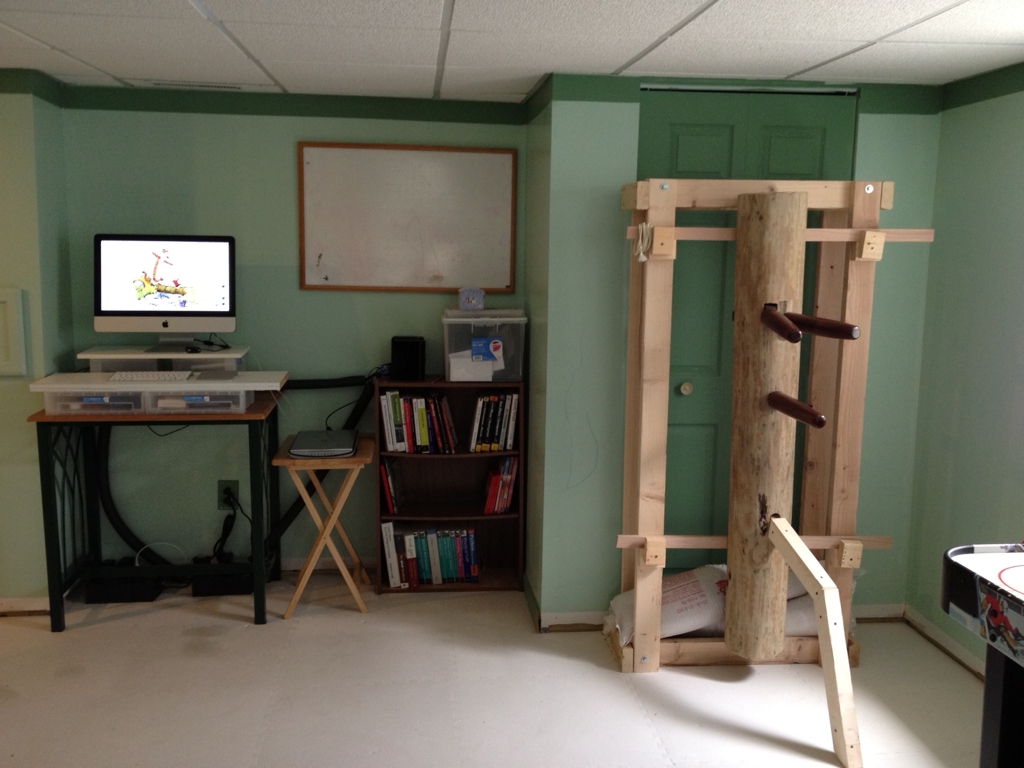
The dummy as it stands now
Even though the dummy isn’t perfect, it’s perfectly usable and beneficial as a training tool. Merely having the dummy isn’t enough though. One really needs the expert training of an instructor to learn how to train with a wooden dummy. I was very fortunate to have learned at Philip Nearing’s Wing Chun School in Chicago. With the right instructions and a generous dose of patience you too can make and use a Wooden Dummy.